As
we have torn into walls in the existing house, we have discovered much about
the building practices of the 1930s. It's truly wonderful really.
When
we first looked at the property, I took note that I could not see any evidence
of termite damage (odd for a house of any age in this part of the country). The first time we cut into an existing wall,
I figured out why. I have always loved
the smell of cut lumber—it reminds me of my dad working in the garage nearly
every weekend I can remember. I
especially love the smell of cut cedar, and that is exactly what I smelled when
we cut into one of our walls. Not only
is every wall lined with 1 inch thick shiplap, but every stud and every wall
board is cedar—no wonder the termites aren’t interested.
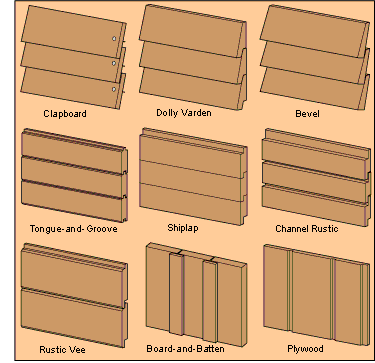 |
| Guide to types of siding. See shiplap in the middle. |
 |
| The famous ” Feed sack dress” – 1940s ration fashion. Not just for dresses |
As
soon as I discovered the shiplap, I knew I wanted to expose at least some of it
and decided the best spot would be the kitchen wall where I want to put open shelving
for dishes and dry goods. It was a very
dusty process, but I got the wall cleaned off, nails, tacks and staples
removed, seams caulked and boards primed, and now I have a perfectly farmhouse-y
background in my kitchen. (It does,
however, still need a few coats of paint before shelves go up. I’m waiting for counters to be completed
before I do that.)
 |
| Exposed shiplap after most of the wall paper came down. |
 |
| Existing exposed shiplap was caulked primed and painted. We will add exposed shelving after the counters are installed. |
We will open up the space between the existing house and the addition soon, and I really feel like we need to do something to tie the two spaces together. When I discovered that the local lumber yard carries the same size shiplap as they used on my house nearly 80 years ago, I decided that an exposed shiplap wall in the new dining room was the way to go.
I priced shiplap at the local lumber yard as well as McCoy’s and Sutherlands in the nearby town. I even discovered that Home Depot carries it. Wait! Not true. They list it on their website but do not stock it anywhere I could find within 150 miles. It turns out that my local lumber yard, which closes every weekday at 5:00, noon on Saturdays and is closed on Sunday, must be more suited to older homes as they carry shiplap in a variety of lengths and have the best prices and great service.
 |
| At our local lumber yard. They load it all on the truck for you. |
My
husband and I showed up at the lumber yard one Saturday morning with Grandpa’s
big ranch truck (a King Ranch edition F350 that I sort of have a crush on),
placed our order and got loaded down with boards for my dining room wall. (Actually, it wasn’t loaded down at all—not like
our F150 would have been. I’m thoroughly
impressed with the load capacity of this truck—hence, the crush I have on it.)
From
there, my husband installed my wall, sometimes using rather comical
methods. Since wood is natural and there
are no straight lines in nature, not every board slid right into place. Many needed some coaxing, coercing or just
plain man-handling to get into place. It
is now completed and also ready for paint.
I absolutely love the look of it and can’t wait to see what it all looks
like once everything is completed.
 |
| They even let me be really picky about which boards I want to keep and the ones I don't like. Here, my husband is checking to see how straight the boards are. |
 |
| Not all the boards were perfectly straight--some required some flexibility and brute force to get them into place properly. |

No comments:
Post a Comment