Monday, February 13, 2017

I'm SO behind here... jumping ahead to the master bath!

The master bathroom is actually the final major project that stands between me and a completely redone home. What this means is that I have left out the construction and/or transformation of about 11 other rooms. The fact is, I need help now though...

The real question is, "to paint or not to paint?"

Paint the ceiling something other than white--like a delightful shade of green to coordinate with my amazing blue ceiling in the master bedroom (you'll be able to see both ceilings through the frosted glass transom above the barn door leading into the bathroom)? Or leave it white with white trim? Or leave it white and paint the trim green or blue (baseboards are blue in the bedroom)?

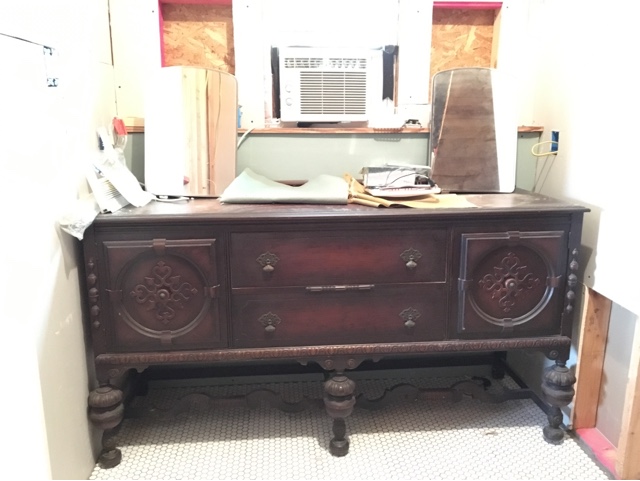
What about the vanity--painted (green, blue or possibly grey) or leave it dark antique brown and just seal it with several coats of poly?

Claw foot tub--paint it all white? Black base? White feet, black, chrome or antique brass?

Basic bathroom plans: 
Mirrors are vintage medicine cabinets. 
We'll have white subway tile all the way around the room up to about 4 feet high--to the ceiling on two side of the shower, the back shower wall will be (I think) a black and white patterned tile from Home Depot (8"x8" tiles, cement-look) as will the wall with the mirrors and window. The tile produces a quatrefoil pattern that mimics the medallion on the vanity as well as the headboard in the bedroom. 
The floor is white hexagon mosaic tiles that my youngest daughter (now 12) and I put down last fall. (We have replaced our roof, added a larger dormer to the attic in hopes of an expansion way in the future, done major car repairs, replaced a water heater, and paid the vet to save a dog's life--all of which have delayed the master bathroom...) 
Not sure what the shower floor will be. 
A restored claw foot tub (that presently sits in my carport and is a favorite nap spot for our cats) will sit under the stairs, which are clad in reclaimed ship lap from walls that we took down in between the original living and dining area--wait until I finally show you what I did with the rest of that wood. 
Faucets will likely be antique brass. Light fixtures are black/rubbed bronze schoolhouse style--single light sconces for the vanity, 4-light chandelier for the ceiling. 


Monday, September 8, 2014

Rockin' C: Open for Business

The Rockin' C officially opened for business this past weekend--the business of reading, playing, sleeping and dreaming, that is. My oldest daughter declared years ago that when she one day has her own ranch, her brand would be a rocking C. (A few months prior to her 10th birthday, I stumbled across a branding iron C at a local antique shop. I had a farrier friend add the rocking bar underneath it for her birthday that year.) This year, for her 12th birthday, she moved into her new room--the Rockin'C--with a view straight out to the horse pasture. 


She literally can lie on her bed and watch her horse, Paisley, graze in the pasture. Despite her size at nearly 1000 pounds, Paisley managed to get a bit of her own presence in the new room. In lieu of satisfying my outdoor-loving girl's idea to install fake grass as her flooring (or of satisfying a dream she once had in which Paisley actually came into her room), we instead went with wide-plank wood (actually, 1x8 pine shiplap from the local lumber yard that we sanded, glued and nailed down with Liquid Nails construction adhesive and a finishing nailer) that was then white-washed and to which we stenciled white paisleys randomly around the room. 


I looked up several tutorials on whitewashing floors prior to trying it out. They all sounded way too complicated and had way too many steps for my taste. So, in true "me" fashion, I made up my own method. I took one party-sized styrofoam cup full of the white paint I have selected to use for trim and moulding as well as some walls around the house (Sherwin Williams Snowbound in an eggshell finish), poured it into an empty paint can, added water up to about an inch and a half from the top and stirred with a paint stick. From there, I poured my mixture into a paint pan and started rolling it onto the floor stopping every two or three boards to brush out the whitewash finish with a wide paintbrush (otherwise the roller left bubble marks on the wood instead of a smooth finish). (Pouring into the paint pan was a messy job as the thin mixture has a tendency to splatter. It also has to be stirred and restirred frequently to prevent the paint from separating from the water.) This method achieved exactly what I was hoping for in far fewer steps than I found anywhere else. 

We purchased a large paisley stencil at Hobby Lobby. We actually found it in the fabric craft section where they have all their canvas and burlap bags, aprons, etc. instead of where all the other large decorative stencils are. Together, my daughter and I chose a few random spots around the room to add her paisleys with a dry paintbrush dipped in the same paint as we used for the whitewash. (A stencil brush or sponge would have worked better, but we forgot to pick one up at Hobby Lobby when we were there and it was just too far to turn around to go back.) In addition to her wood floors, which we will carry throughout the upstairs now that we know we like the look, she also got a natural wood ceiling to keep the rustic feel going. 

I am so pleased with how her room turned out. It has just enough rustic for her, and her interests are clearly represented throughout the room. It also ended up girlier and more elegant than I expected her to like. She's my rough and tough cowgirl who lives in old t-shirts with ripped up dirty jeans and boots even in the heat of summer. She calls lace "white junk" and shuns most skirts and nearly all hair adornments. In this room, however, I can picture her with her sister, cousin and best friends as she gets ready on her wedding day. There's a sophistication in her new room that she's really fallen in love with. She still hasn't moved all of her stuff from her old room because she doesn't want anything to junk up her new room. (This comes as a shocker to all who know her since usually a trip into her room is going to involve several trips, as in you stumbling over and through the piles on her floor.) She says this room is too pretty to get messy. She has even made her bed each morning since she has waken up in there--without me reminding her!

complete with baseboards (also whitewashed) and ready for load-in


Horse show ribbons are hung on jute cord stapled to the back of a frame made from old fence wood.
The crosses are part of her collection, and the barrel racer picture was an anonymous gift that showed up in my office one day at work.  We still are not sure who the generous gifter was, but we have our suspicions.  In any case, it fits her room and her passions perfectly.
Her bedding is the same bedding she has had since I redid her room for her 4th birthday (also a horse-themed room).

She became an even more avid reader this summer, so she inherited a chair I had recovered for my room at the old house.  The colors fit in perfectly with the color scheme she chose.

Her cross collection made it up onto the wall today.  The one centered at the top was a present for a Christmas or birthday (note the three barrels and the cloverleaf pattern for my barrel-racing enthusiast).  The two on either side were gifts to commemorate her baptism.  The bottom right was made by Dad with some leftover wood one afternoon.
She has a collection of snowglobes (12, to be exact) that still need to move upstairs that will fill her dresser top and the shelves on her vanity.

She never has been much into dollhouses, but this barn from Grandma fits her perfectly.


My mom decoupaged this back in the '70s.  I remember it hanging in various spots around the house over the years.
Evidentally, it made it into the hands of one of my aunts who recently handed it down to my daughter.

Looking to add more blue to the ribbon display at an upcoming horse show...

Her 12th snowglobe from Dad to celebrate her 12th birthday--a beagle in rememberance of our sweet Elvis that we lost earlier this summer.  Next to her horse, he was probably her best friend.


Saturday, May 10, 2014

A tale of two ovens

My kitchen at my old house really was lovely.  After years of living with a small kitchen just larger than that in our first apartment, we decided to redo and enlarge it by tearing down some awkward columns and taking in one of the three living spaces in our 2000 square foot house.  The results were wonderful and served our family and guests quite well.  One of the things I loved the most was my large set of Frigidaire double convection ovens.
Those are my beloved ovens in the background behind my beloved daughter, an avid baker, around Christmas time a few years ago.


As much as I loved those ovens, I knew I needed a comparable replacement for the kitchen at the new house.  The oven left behind by Previous Owner had been grossly neglected by Previous Tenant.  It was a cheap gas range that was dirty, unlevel, heated unevenly and all around stunk.

I considered getting the newer model of my old Frigidaires, but they changed several features and added a "Chicken Nugget" button.  To me, that was a stupid enough addition to keep me from buying from them.  I researched and researched and finally decided on a beautiful, double-convection, classically styled Kenmore Pro.  To my delight, I found a floor model on the Sears Outlet website for half the cost of a new one.  I selected the coordinating 5-burner gas cooktop, added both to my online shopping cart, made my purchase, including the extended warranties, and waited for them to be shipped.

My cooktop arrived a short 10 days after the placing of my order, as promised.  I ordered these way back at the end of December, knowing full well that the kitchen renovation was still months away, so I was in no hurry.  But then several more days went by and my ovens had yet to arrive.  Then several more days.  And then a couple of weeks.  I began placing calls to Customer Service.  The service reps were absolutely wonderful--so polite, well-spoken and appearing genuinely concerned about the delay in my order.  I can't speak highly enough of them.  But I still didn't have my ovens.  Long story short, after several calls that I had to place (Sears never called me to explain the delay) as well as broken glass on the original oven that was set to be shipped to me, I received three more large discounts off of the already discounted price I originally paid and had a brand new, straight from the factory, non-floor model that finally did arrive--about 3 months later than originally promised.

The ovens then sat in my carport waiting for the day they could finally get moved in.  They are, however, quite huge, and my house sits a good 4 feet off the ground and has no ramp.  My husband suggested that he and I could handle moving them in.  While I appreciate his confidence in my strength, I knew this was a bad plan.  We called a local kid who has done some work at the Rectangle for my father-in-law, but he was busy.  Thankfully, his older (and much larger) brother was available. Randy came over and, with seemingly relative ease, helped my husband hoist the beast up the back steps and into the kitchen where it awaited final installation.  I think I may have held my breath the entire time the ovens were in motion, but they made it to their next resting spot unscathed.


Wednesday, May 7, 2014

I conquered IKEA cabinetry


We pretty well knew from the beginning that we would use IKEA cabinetry in our kitchen renovation.  The price is right (especially during one of their 20% off kitchens sales) and it looked like something we could do ourselves.  While we were in the process of selling the old house, we made several trips to IKEA as well as their website as we planned a layout for the new kitchen.  One of the very first things we did after getting our check from the sale of our house was head straight to IKEA to purchase our cabinets.

Their cabinet experts are super helpful and aided us in laying out exactly what we wanted using their computers at the store.  I received a complete printout of everything we needed and how it was to be laid out.  We scheduled delivery, and like with so many other things we purchased for the renovation, stored the piles of boxes of flat-packed cabinetry in the carport until we were ready to get to it.


Overhead shot of kitchen layout

IKEA cabinets are wonderful because they really can be completely customized to your own space and tastes.  However, because of the degree of customization available, each feature is basically an option and therefore comes separately from the base product.  That means LOTS of different boxes each with their own numbers.

I went through my item list from the order print out and began sorting the item numbers into my own list based on which wall of the kitchen the items were intended to be installed.  I could not have done this without the IKEA app for my iPhone. I sat on my sofa (also an IKEA purchase) with a clipboard, a pencil, my original item list and my phone.  I entered in item numbers and figured out which cabinet they went to and which accessories (drawers, drawer fronts, etc.) went with what.


The app was also invaluable when it came to installation.  Every item that requires assembly (which is just about everything from IKEA, hence the savings) is listed in the app along with the instructions for installation AND a list of all parts that correspond.  For instance, I was installing a base cabinet with 4 drawers.  I was able to go to the kitchen product section, find the cabinet I wanted, select the cabinet front that I was using and then found a complete list of all related item numbers.  I, then, could cull through the piles of boxes in my back room and locate the boxes based on their numbers.  From there, the assembly instructions are really pretty simple.  They get even easier after you put together 3 or 4 or 17 or... I did this over and over and over until every cabinet was assembled.  It became somewhat of a tedious process but completely worth it.  I will, however, admit that my hands and fingers actually became sore and nearly rubbed raw from the masses of tiny screws and nails that I handled over the course of the several days that I was doing this.

I can't say it enough:
If you are going to install IKEA cabinets yourself, GET THE APP!!  Also, it's free.


I originally had not planned on purchasing my sink at IKEA, but I fell in love with the double-bowl apron front.
Also, it was 20% off along with all our cabinets, as well as our dishwasher and vent hood.


Conveniently, flattened IKEA boxes make GREAT floor protectors as we continued with kitchen renovation.


I love that we were able to purchase a cover panel for our dishwasher that matches the rest of the cabinets.
It installed really easily, and for those who have concerns about buying a Swedish dishwasher, worry not.  All IKEA appliances are actually Whirlpool appliances and can be serviced by anyone who services Whirlpool.  It's been 4 months and we have no issues to report.
Actually, we were having some issues with film on our glasses and dishes not getting clean, but we figured out that our well water was the issue.  We switched to all LemiShine products, and now our dishes sparkle.

Tuesday, April 29, 2014

Under 5 layers of flooring

Friday was wall demolition.  Saturday was time to rip up the flooring—the many, many layers of flooring.

We knew this would be quite a task because we could tell that the kitchen floor was significantly higher than the rest of the floors in the house.  We were pretty certain we would find a few layers.

Thankfully (I guess), Previous Owner pretty much stinks at tile installation and most of it came up relatively easily.  The problem was that Previous Owner, in all his home renovation wisdom and know-how, laid said tile on top of cement board that he screwed down to old flooring that he must not have felt like removing.  But wait!  This wasn’t cement board intended for underlay for tile.  Previous Owner used a Hardie board-like product that is, in fact, intended to be siding, not flooring.  Given the other genius choices he had made, we really weren’t surprised, and were, in fact, ready for any crazy decisions he may have made.

The “cement board”  was screwed down on top of a layer of vinyl flooring circa 1970-something.  The vinyl flooring was on top of a layer of linoleum circa 1960.  The linoleum was on top of another layer of linoleum from 1947, which sat on top of a layer of newspaper—including The Houston Post—from February 1947.  I’m guessing this newspaper served the same purpose for the floors as the feed sack did for the walls.  I must admit, this was a pretty cool discovery—dusty, like everything else right now, but really, really cool!


Lots of layers!
We found old ads for everything from Folgers Coffee to Red Brand Fence products to Lane Bryant (for “stout” women) to Little Orphan Annie and Dick Tracy comics to the first aerial shot of the Texas Medical Center (which, at that time, was home to all of three buildings and surrounded by grass and trees).  We pulled up as many intact papers as we could.  We will save and frame several.  My favorite find, however, we were not able to save as it had become one with the subfloor in front of the sink.  This was an ad for Walt Disney’s Song of the South that was playing at The Majestic Theatre in Downtown Houston.  Song of the South is difficult, if not impossible, to find in the U.S. these days (it’s not considered politically correct enough to sell).  I find Uncle Remus completely charming, however, and love his stories—the ones about Brer Fox and Brer Bear and Brer Rabbit my dad used to tell me at bedtime.  And who doesn’t love singing Zipadee Do Dah!?  Nevertheless, P.C. or not, it’s such a piece of history and it’s right there under my floor.  (I at least got a good picture that I might print up and frame.)


Newspaper laid on top of tongue-n-groove subfloor

Walt Disney's Song of the South playing at The Majestic